Showing posts with label Android. Show all posts

13 December, 2015

Android JSON Parsing Using okHttp Example with New Material Design Library

Hello to everyone, Today I am posting about JSON Parsing in Android using okHttp Library.

HTTP is the way modern applications network. It’s how we exchange data & media. Doing HTTP efficiently makes your stuff load faster and saves bandwidth.

I found many documentation to understand okHttp but I want to share my example which i have created as Demo.

Prerequisites: 

1. What is JSON?
2. Android Studio Basics

Example:

Create New Project in Android Studio android follow the instructions.

Permissions in AndroidManifest.xml

<uses-permission android:name="android.permission.INTERNET" />


Add following gradle dependency in build.gradle:

compile 'com.android.support:appcompat-v7:23.1.0'  
compile 'com.android.support:design:23.1.0'  
compile 'com.squareup.okhttp:okhttp:2.0.0'  

JSON Parser File (Copy Class and Paste in Your src Folder):


 /**  
  * @author Pratik Butani  
  */  
 public class JSONParser {  
   /********  
    * URLS  
    *******/  
   private static final String MAIN_URL = "http://pratikbutani.x10.mx/json_data.json";  
   /**  
    * TAGs Defined Here...  
    */  
   public static final String TAG = "TAG";  
   /**  
    * Key to Send  
    */  
   private static final String KEY_USER_ID = "user_id";  
   /**  
    * Response  
    */  
   private static Response response;  
   /**  
    * Get Table Booking Charge  
    *  
    * @return JSON Object  
    */  
   public static JSONObject getDataFromWeb() {  
     try {  
       OkHttpClient client = new OkHttpClient();  
       Request request = new Request.Builder()  
           .url(MAIN_URL)  
           .build();  
       response = client.newCall(request).execute();  
       return new JSONObject(response.body().string());  
     } catch (@NonNull IOException | JSONException e) {  
       Log.e(TAG, "" + e.getLocalizedMessage());  
     }  
     return null;  
   }  
 }  

Layout File: activity_main.xml


<android.support.design.widget.CoordinatorLayout xmlns:android="http://schemas.android.com/apk/res/android"  
   xmlns:app="http://schemas.android.com/apk/res-auto"  
   xmlns:tools="http://schemas.android.com/tools"  
   android:layout_width="match_parent"  
   android:id="@+id/parentLayout"  
   android:layout_height="match_parent"  
   android:fitsSystemWindows="true"  
   tools:context=".MainActivity">  
   
   <android.support.design.widget.AppBarLayout  
     android:layout_width="match_parent"  
     android:layout_height="wrap_content"  
     android:theme="@style/AppTheme.AppBarOverlay">  
   
     <android.support.v7.widget.Toolbar  
       android:id="@+id/toolbar"  
       android:layout_width="match_parent"  
       android:layout_height="?attr/actionBarSize"  
       android:background="?attr/colorPrimary"  
       app:popupTheme="@style/AppTheme.PopupOverlay" />  
   
   </android.support.design.widget.AppBarLayout>  
   
   <ListView app:layout_behavior="@string/appbar_scrolling_view_behavior"  
     android:id="@+id/listView"  
     android:layout_width="fill_parent"  
     android:layout_height="match_parent" />  
   
   <android.support.design.widget.FloatingActionButton  
     android:id="@+id/fab"  
     android:layout_width="wrap_content"  
     android:layout_height="wrap_content"  
     android:layout_gravity="bottom|end"  
     android:layout_margin="@dimen/fab_margin"  
     android:src="@android:drawable/stat_sys_download" />  
   
 </android.support.design.widget.CoordinatorLayout>  

MainActivity.java

 public class MainActivity extends AppCompatActivity {  
   
   private ListView listView;  
   private ArrayList<String> list;  
   private ArrayAdapter<String> adapter;  
   
   @Override  
   protected void onCreate(Bundle savedInstanceState) {  
     super.onCreate(savedInstanceState);  
     setContentView(R.layout.activity_main);  
   
     Toolbar toolbar = (Toolbar) findViewById(R.id.toolbar);  
     setSupportActionBar(toolbar);  
   
     /**  
      * Array List for Binding Data from JSON to this List  
      */  
     list = new ArrayList<>();  
     /**  
      * Binding that List to Adapter  
      */  
     adapter = new ArrayAdapter<>(this, android.R.layout.simple_list_item_1, android.R.id.text1, list);  
   
     /**  
      * Getting List and Setting List Adapter  
      */  
     listView = (ListView) findViewById(R.id.listView);  
     listView.setAdapter(adapter);  
     listView.setOnItemClickListener(new AdapterView.OnItemClickListener() {  
       @Override  
       public void onItemClick(AdapterView<?> parent, View view, int position, long id) {  
         Snackbar.make(findViewById(R.id.parentLayout), list.get(position), Snackbar.LENGTH_LONG).show();  
       }  
     });  
   
   
     FloatingActionButton fab = (FloatingActionButton) findViewById(R.id.fab);  
     fab.setOnClickListener(new View.OnClickListener() {  
       @Override  
       public void onClick(@NonNull View view) {  
   
         /**  
          * Just to know onClick and Printing Hello Toast in Center.  
          */  
         Toast toast = Toast.makeText(getApplicationContext(), "Hello in Center", Toast.LENGTH_LONG);  
         toast.setGravity(Gravity.CENTER,0,0);  
         toast.show();  
   
         /**  
          * Checking Internet Connection  
          */  
         if (InternetConnection.checkConnection(getApplicationContext())) {  
           new GetDataTask().execute();  
         } else {  
           Snackbar.make(view, "Internet Connection Not Available", Snackbar.LENGTH_LONG).show();  
         }  
       }  
     });  
   }  
   
   /**  
    * Creating Get Data Task for Getting Data From Web  
    */  
   class GetDataTask extends AsyncTask<Void, Void, Void> {  
   
     ProgressDialog dialog;  
   
     @Override  
     protected void onPreExecute() {  
       super.onPreExecute();  
       /**  
        * Progress Dialog for User Interaction  
        */  
       dialog = new ProgressDialog(MainActivity.this);  
       dialog.setTitle("Hey Wait Please...");  
       dialog.setMessage("I am getting your JSON");  
       dialog.show();  
     }  
   
     @Nullable  
     @Override  
     protected Void doInBackground(Void... params) {  
   
       /**  
        * Getting JSON Object from Web Using okHttp  
        */  
       JSONObject jsonObject = JSONParser.getDataFromWeb();  
   
       try {  
         /**  
          * Check Whether Its NULL???  
          */  
         if (jsonObject != null) {  
           /**  
            * Check Length...  
            */  
           if(jsonObject.length() > 0) {  
             /**  
              * Getting Array named "contacts" From MAIN Json Object  
              */  
             JSONArray array = jsonObject.getJSONArray(Keys.KEY_CONTACTS);  
   
             /**  
              * Check Length of Array...  
              */  
             int lenArray = array.length();  
             if(lenArray > 0) {  
               for(int jIndex = 0; jIndex < lenArray; jIndex++) {  
                 /**  
                  * Getting Inner Object from contacts array...  
                  * and  
                  * From that We will get Name of that Contact  
                  *  
                  */  
                 JSONObject innerObject = array.getJSONObject(jIndex);  
                 String name = innerObject.getString(Keys.KEY_NAME);  
   
                 /**  
                  * Getting Object from Object "phone"  
                  */  
                 JSONObject phoneObject = innerObject.getJSONObject(Keys.KEY_PHONE);  
                 String phone = phoneObject.getString(Keys.KEY_MOBILE);  
   
                 /**  
                  * Adding name and phone concatenation in List...  
                  */  
                 list.add(name + " - " + phone);  
               }  
             }  
           }  
         } else {  
   
         }  
       } catch (JSONException je) {  
         Log.i(JSONParser.TAG, "" + je.getLocalizedMessage());  
       }  
       return null;  
     }  
   
     @Override  
     protected void onPostExecute(Void aVoid) {  
       super.onPostExecute(aVoid);  
       dialog.dismiss();  
       /**  
        * Checking if List size if more than zero then  
        * Update ListView  
        */  
       if(list.size() > 0) {  
         adapter.notifyDataSetChanged();  
       } else {  
         Snackbar.make(findViewById(R.id.parentLayout), "No Data Found", Snackbar.LENGTH_LONG).show();  
       }  
     }  
   }  
 }  

Output:

Download Demo from GitHub: JSON Parsing using okHttp

Hope You will enjoy with Android JSON Parsing with okHttp and basic of Android Design Library.

Any question, Any query, Any suggestion Always Welcome. Do comment.

Thank you.

18 August, 2015

MarshMallow : Android M is now #MarshMallow

Get your apps ready for Android Marshmallow:

The final Android 6.0 SDK is now available to download via the SDK Manager in Android Studio. With the Android 6.0 SDK you have access to the final Android APIs and the latest build tools so that you can target API 23. Once you have downloaded the Android 6.0 SDK into Android Studio, update your app project compileSdkVersion to 23 and you are ready to test your app with the new platform. You can also update your app to targetSdkVersion to 23 test out API 23 specific features like auto-backup and app permissions.

Along with the Android 6.0 SDK, we also updated the Android Support Library to v23. The new Android Support library makes it easier to integrate many of the new platform APIs, such as permissions and fingerprint support, in a backwards-compatible manner. This release contains a number of new support libraries including: customtabs, percent, recommendation, preference-v7, preference-v14, and preference-leanback-v17.

Check your App Permissions:

Along with the new platform features like fingerprint support and Doze power saving mode, Android Marshmallow features anew permissions model that streamlines the app install and update process. To give users this flexibility and to make sure your app behaves as expected when an Android Marshmallow user disables a specific permission, it’s important that you update your app to target API 23, and test the app thoroughly with Android Marshmallow users.

How to Get the Update:

The Android emulator system images and developer preview system images have been updated for supported Nexus devices (Nexus 5, Nexus 6, Nexus 9 & Nexus Player) to help with your testing. You can download the device system images from the developer preview site. Also, similar to the previous developer update, supported Nexus devices will receive an Over-the-Air (OTA) update over the next couple days.

Although the Android 6.0 SDK is final, the devices system images are still developer preview versions. The preview images are near final but they are not intended for consumer use. Remember that when Android 6.0 Marshmallow launches to the public later this fall, you'll need to manually re-flash your device to a factory image to continue to receive consumer OTA updates for your Nexus device.

What is New

Compared to the previous developer preview update, you will find this final API update fairly incremental. You can check out all the API differences here, but a few of the changes since the last developer update include:
  • Android Platform Change:
    • Final Permissions User Interface — we updated the permissions user interface and enhanced some of the permissions behavior.
  • API Change:
    • Updates to the Fingerprint API — which enables better error reporting, better fingerprint enrollment experience, plus enumeration support for greater reliability.

Upload your Android Marshmallow apps to Google Play:

Google Play is now ready to accept your API 23 apps via the Google Play Developer Console on all release channels (Alpha, Beta & Production). At the consumer launch this fall, the Google Play store will also be updated so that the app install and update process supports the new permissions model for apps using API 23.

To make sure that your updated app runs well on Android Marshmallow and older versions, we recommend that you use Google Play’s newly improved beta testing feature to get early feedback, then do a staged rollout as you release the new version to all users.

24 September, 2013

How to make your users aware of incorrect input in Android

Did you ever enter a wrong password and got an AlertDialog telling you that you entered something wrong?
You probably did and you probably also noticed that this AlertDialog most likely takes one more click to continue, a click that could be saved. One way to avoid the AlertDialog are Toasts. Here are two nice but rarely used other ways to tell your users that they should enter something different.

Setup:


Let’s assume we have an EditText which we use in our UI.

EditText mEditText ;
mEditText = (EditText ) findViewById(R.id.myEditText );

Furthermore we have a method showError() which we call when the EditText contains invalid data.

  • Shake:

A nice way to show the user that, for example, an entered password was incorrect is to shake the EditText. Please note that I took this code from the official ApiDemos and modified it slightly.

First, we have to define our shake animation. Go to your res folder, create the subfolder anim and place a file shake.xml in it. In this file, create a translation like this:

<translate xmlns:android="http://schemas.android.com/apk/res/android" android:fromXDelta="0%" android:toXDelta="5%" android:duration="1000" android:interpolator="@anim/cycle_7" />
TranslateAnimation let us move views on the x or y axis of our screen. Since we want to shake it from left to right, we only apply the translation on the x axis. We move it from zero percent of the view’s width to five percent of the view’s width and let the translation last one second (1000 ms). Furthermore, we use the interpolator cylce_7 which is placed in anim/cycle_7.xml and looks like the following:

<cycleInterpolator xmlns:android="http://schemas.android.com/apk/res/android" android:cycles="7" />


It’s a simple CycleInterpolator. This kind of interpolators express the number of repetitions an animation should do. In our case, we repeat the animation seven times.
Now we only need to apply our shake animation to our EditText every time something incorrect is entered. We can do it like this:
private void showError() {
      Animation shake = AnimationUtils.loadAnimation(this, R.anim.shake);
      mEditText.startAnimation(shake);
}
That’s it. Super easy, super smooth integration into the UI.

  • setError()

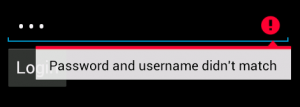
This is my personal favourite. It is the setError()-method which comes out of the box with the EditText view. When calling this method, the right hand compound drawable of the will be set to the error icon. When the EditText also has focus, the text you gave to setError() will be shown in a popup. If you don’t like the default error icon, you can also use setError(CharSequence error, Drawable icon) to set your own icon. The routine to show errors can then look like this:
private void showError() {    mEditText.setError("Password and username didn't match");}
Which will result in errors shown like this:
setError() on ICS
Figure: EditText setError();

Which looks good, catches the user’s attention and doesn’t need any extra clicks to disappear.

Conclusion

Showing errors without interrupting the user flow can be accomplished easily on the Android platform  For even more attention by the user, the two methods mentioned can also be combined.
Please feel free to share your methods of showing error messages in the comments.

19 July, 2013

12 July, 2013

Creating an Android “Hello World” Application with PhoneGap

Creating Android “Hello World” Application using PhoneGap


What is PhoneGap?

PhoneGap is an open source platform that allows you to create cross-platform mobile applications with HTML, JavaScript, and CSS. In order to interact with device hardware, PhoneGap provides a JavaScript API that will interface with features such as the on-board camera, GPS, and accelerometer. Even though PhoneGap is great for developing cross-platform applications, the code for developing applications while targeting one platform or another will vary. One of the greatest differences to overcome is the required software requirements. This tutorial will provide an in-depth review of setting up your development environment for Android, and will build a simple “Hello World” app.


PhoneGap Requirements for Android Development:

Java JDK

You will need to install the Java Development Kit (JDK). Follow the official instructions for setting this up.

Android SDK

You will also need the Android Software Development Kit. When you install the SDK, you will need to set the the android-sdk-<os>/tools for your user PATH variable.
System Properties

Eclipse

You will need to download and install Eclipse if you don’t already have it on your machine.

Eclipse ADT Plugin

You will need to also install the ADT plugin for Eclipse. ADT (Android Development tools) is a plugin of eclipse which provide a complete IDE for developing Android application. ADT lets you create new Android projects, and it lets you create Android projects from existing source (this is the way we will open our PhoneGap app for android on eclipse). Using ADT you can also debug an android application. As ADT is well integrated with android SDK running the app from the IDE directly launches the android emulator.
To install ADT click on “install new software” in your Eclipse’s help window and enter the following site to work with: http://dl-ssl.google.com/android/eclipse/. Then follow the wizard presented to install ADT.
ADT Screen

Android Platforms and Components

Once you have ADT installed, you will need to install the Android platform and other components. To do that, go to menu option window->Android DK and AVD manager and select the platform and API level. Android api 2.2 is latest at the time of writing this article.
ADT Configuration

Apache Ant

If you don’t have apache ant installed you can download it from http://ant.apache.org/bindownload.cgi. To install it you will just extract the downloaded Zip file and set the bin folder in the ant directory in you PATH variable.

Ruby

If you don’t have Ruby installed, you can download it from this free installer. Once installed, add the Ruby/bin path into your account’s PATH variables.

PhoneGap Framework

Of course, you will also need the PhoneGap Framework itself.
PhoneGap-Android Download

Creating Your Development Workspace

Environment Variables Check:

The following paths should be set in you account’s PATH variable:
  • your_system_path/jdk/bin
  • your_system_path/android-sdk/tools
  • your_system_path/ruby/bin
  • your_system_path/apache-ant/bin
Apart from these, you will need to set the following variables also:
  • JAVA_HOME – path of your JDK directory
  • ANT_HOME – path of you apache-ant directory
  • ANDROID_HOME – path to your android SDK directory.
To create a workspace for your PhoneGap app on android, go to the “phonegap-android” folder on the command prompt or terminal:
  1. ruby ./droidgap "[android_sdk_path]" [name] [package_name] "[www]" "[path]"  
  • android_sdk_path: Where you installed the SDK
  • name: The name to give the new application.
  • package_name: The name you want to give to your application.
  • www: The folder from where you want to copy the files of your PhoneGap app.
  • path: The application workspace for your project.
Once you run the command and if everything goes correct messages as shown below will be seen:
PhoneGap Command Line Android
The above should create a complete workspace for your PhoneGap Android app.
Workflow

Setup Your Project in Eclipse

Once this is done, this workspace can be opened in eclipse. In eclipse choose new project and then choose Android Project.
Create Android Eclipse Project
Next select “create project from existing source” and give the project a name as shown below.
Configure an Android Eclipse Project
If you try to build and run the project in Eclipse you will get a build error. This is because you have not added the external library (phonegap.jar) which is created in the libs folder of your workspace.
Remove Build Errors
To add that external library right click on the project an select Build Path-> Add external archive and then select the phonegap.jar in your libs folder.
Remove Build Errors 2
If all goes well, this should remove all the build errors in your project. Now try to run your project in the emulator. You should see the screen below. This is because you have not added any PhoneGap HTML or JavaScript files in your project.
Running the Hello World App
In the assets/www folder of the workspace, there will already be a file called phonegap.js. In that folder create a file called index.html with the following code:
  1. <!DOCTYPE HTML>  
  2. <html>  
  3.   <head>  
  4.     <meta name="viewport" content="width=320; user-scalable=no" />  
  5.     <meta http-equiv="Content-type" content="text/html; charset=utf-8">  
  6.     <title>PhoneGap Android App</title>  
  7.               <script type="text/javascript" charset="utf-8" src="phonegap.js"></script>  
  8.               <script type="text/javascript" charset="utf-8">  
  9.                         var showMessageBox = function() {  
  10.                              navigator.notification.alert("Hello World of PhoneGap");  
  11.                         }  
  12.                         function init(){  
  13.                              document.addEventListener("deviceready", showMessageBox, true);  
  14.                         }  
  15.   </script>  
  16.   </head>  
  17.   <body onload="init();"  >  
  18.   </body>  
  19. </html>  
In the code the line:
  1. <script type="text/javascript" charset="utf-8" src="phonegap.js"></script>  
includes the phonegap.js file which lets you call native API’s of android. On the load of the body the init function registers the function showMessageBox on the PhoneGap event deviceready which is triggered when phonegap has done the processing to initialized everything for your program so that it can call the PhoneGap API’s. The showMessageBox function calls the PhoneGap API navigator.notification.alert which displays the message box on screen. Running the app after adding the index.html and refreshing the project in Eclipse you will see the following screen:
Making it an Alert
Now let’s add some more functionality to our app. The following code creates a text box to enter the name of the person and a button when clicked displays a message box:
  1. <!DOCTYPE HTML>  
  2. <html>  
  3.   <head>  
  4.     <meta name="viewport" content="width=320; user-scalable=no" />  
  5.     <meta http-equiv="Content-type" content="text/html; charset=utf-8">  
  6.     <title>PhoneGap</title>  
  7.               <script type="text/javascript" charset="utf-8" src="phonegap.js"></script>  
  8.               <script type="text/javascript" charset="utf-8">  
  9.               var displayHello = function() {  
  10.                         var name =      document.getElementById("firstname").value;  
  11.                         navigator.notification.alert("name" + name);  
  12.             }  
  13.    </script>  
  14.   </head>  
  15.   <body onload="init();" id="bdy" >  
  16.             <div id="txt">  
  17.             <input   type="text" name="firstname" id="firstname" />  
  18.             </div>  
  19.             <div id ="btn">  
  20.     <a href="#" class="btn" onclick="displayHello();">Say Hello</a>  
  21.             </div>  
  22.         </div>  
  23.   </body>  
  24. </html>  
In the following line of code we have created a text box where you can enter your name.
  1. <input   type="text" name="firstname" id="firstname" />  
In the line
  1. <a href="#" class="btn" onclick="displayHello();">Say Hello  
We have created a link which on click calls the function displayHello which fetches the value from the text box and displays a message box saying hello to the name entered by the user.
Custom Alert Text
Final Preview
The GUI shown above does not have any styling to it. You can beautify the display and add colors to it using a CSS file. Create a master.css in your assets\www folder with the following code:
  1. #bdy  
  2. {  
  3.             background:#F0F0F0;  
  4. }  
  5. #btn a{  
  6.             border: 1px solid #555;  
  7.             -webkit-border-radius: 5px;  
  8.             border-radius: 5px;  
  9.             text-align:center;  
  10.             display:block;  
  11.             float:left;  
  12.             background:#6600CC;  
  13.             width:308px;  
  14.             color:#FFF;  
  15.             font-size:1.1em;  
  16.             text-decoration:none;  
  17.             padding:1.2em 0;  
  18.             margin:3px 0px 3px 5px;  
  19. }  
  20. #txt{  
  21.             border: 1px solid #555;  
  22.             -webkit-border-radius: 5px;  
  23.             border-radius: 5px;  
  24.             text-align:center;  
  25.             display:block;  
  26.             float:left;  
  27.             background:#00FFCC;  
  28.             width:308px;  
  29.             color:#9ab;  
  30.             font-size:1.1em;  
  31.             text-decoration:none;  
  32.             padding:1.2em 0;  
  33.             margin:3px 0px 3px 5px;  
  34. }  
In your index.html add the following line before in your head tags to link to master.css:
  1. <link rel="stylesheet" href="master.css" type="text/css" media="screen" title="no title" charset="utf-8">  
Now if you run the app you should see a screen like the following:
Final Preview

Conclusion

To create a PhoneGap app on Android, a lot of different software has to work together. This could mean that you could have trouble setting up the complete environment to create a PhoneGap app on Android. However, once all the software is in place, you can easily create PhoneGap apps using open web standards like HTML, JavaScript, CSS and PhoneGap’s own API’s to perform device hardware specific processing. This saves you the trouble of learning the native language for Android programming and still has much of the power of custom, native built Android apps.