27 December, 2013

Let me google that for you

It is very helpful to me to give intro. any link with some different way.

Sometimes i give this link My Introduction with Google to my new friends or others who is unknown with me.

Let's Try:

let methat for you

Just go to http://lmgtfy.com/ and write that you want to search then share link which is given to you.

This is for all those people who find it more convenient to bother you with their question rather than google it for themselves.

Created by @coderifous and @rmm5t.

Inspired during a lunch conversation with @coderifous@tmassing@rmm5t@EricStrattonand @methodvon.

Create your About Us and Share Online

Creating a beautiful, personalized web presence has never been simpler.


Create your personal homepage:


About.me makes it easy for people to learn about you and find your content on the web.

It is About Me.

See who’s interested in you:
Get detailed stats on who visited your page, what they clicked on and where they came from.

About Us Believes:

about.me believes that you should own your own identity. That your identity should be both projected and protected. It should encompass the different facets of your life. It should be portable and universally accessible. And most importantly, it should be easy to create and manage.

Benefits of using about.me:
  • Build Your Online Presence
  • Public Profile
  • Market Your Business
  • Helps in a Job Search
  • Personal Homepage
  • Central Point of Contact

05 December, 2013

Most Common Places Where People Lose Him/Her Cell Phones

Where do People Lose their Mobile Phones

Lookout, a company that develops security and tracking software for mobile phones, has released a report illustrating the top ten locations where one is most likely to lose their cell phone.
Airplane seat pockets, buses, subway trains and the taxi seats are among the most likely places where people lose their cell phones and the unfortunate part is that the chance of recovering the phone in these places is extremely low. People also seem to forget their phones at the Airport security scanner but the recover chances are pretty good in that case.

Most Common Places Where People Lose Him/Her Cell Phones

23 October, 2013

How to Create and Display PDF File in Android

I have created one Demo for Creating and Displaying PDF file in Android.


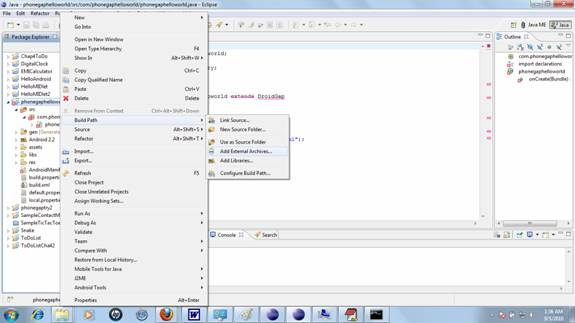
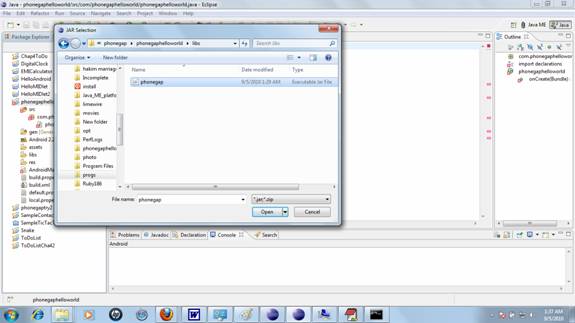
Please follow steps to create Android Project.

I have given Java and XML code as following:

MainActivity.java


package com.example;

import java.io.ByteArrayOutputStream;
import java.io.File;
import java.io.FileOutputStream;
import java.io.IOException;

import android.app.Activity;
import android.content.Intent;
import android.graphics.Bitmap;
import android.graphics.BitmapFactory;
import android.graphics.Color;
import android.net.Uri;
import android.os.Bundle;
import android.os.Environment;
import android.util.Log;
import android.view.View;
import android.widget.Button;
import android.widget.Toast;

import com.lowagie.text.Document;
import com.lowagie.text.DocumentException;
import com.lowagie.text.Font;
import com.lowagie.text.HeaderFooter;
import com.lowagie.text.Image;
import com.lowagie.text.Paragraph;
import com.lowagie.text.Phrase;
import com.lowagie.text.pdf.PdfWriter;

public class MainActivity extends Activity {

private Button createPDF , openPDF;

@Override
protected void onCreate(Bundle savedInstanceState) 
{
super.onCreate(savedInstanceState);
setContentView(R.layout.activity_main);

createPDF = (Button)findViewById(R.id.button1);
createPDF.setOnClickListener(new View.OnClickListener() {
@Override
public void onClick(View v) {
// TODO Auto-generated method stub
createPDF();
}
});
openPDF = (Button)findViewById(R.id.button2);
openPDF.setOnClickListener(new View.OnClickListener() {
@Override
public void onClick(View v) {
// TODO Auto-generated method stub
openPdf();
}
});
}

public void createPDF()
{
Document doc = new Document();

try {
String path = Environment.getExternalStorageDirectory().getAbsolutePath() + "/PDF";

File dir = new File(path);
if(!dir.exists())
dir.mkdirs();

Log.d("PDFCreator", "PDF Path: " + path);

File file = new File(dir, "demo.pdf");
FileOutputStream fOut = new FileOutputStream(file);

PdfWriter.getInstance(doc, fOut);

//open the document
doc.open();

/* Create Paragraph and Set Font */
Paragraph p1 = new Paragraph("Hi! I am Generating my first PDF using DroidText");

/* Create Set Font and its Size */
Font paraFont= new Font(Font.HELVETICA);
paraFont.setSize(16);
p1.setAlignment(Paragraph.ALIGN_CENTER);
p1.setFont(paraFont);

//add paragraph to document    
doc.add(p1);

Paragraph p2 = new Paragraph("This is an example of a simple paragraph");

/* You can also SET FONT and SIZE like this */
Font paraFont2= new Font(Font.COURIER,14.0f,Color.GREEN);
p2.setAlignment(Paragraph.ALIGN_CENTER);
p2.setFont(paraFont2);

doc.add(p2);

/* Inserting Image in PDF */
ByteArrayOutputStream stream = new ByteArrayOutputStream();
Bitmap bitmap = BitmapFactory.decodeResource(getBaseContext().getResources(), R.drawable.android);
bitmap.compress(Bitmap.CompressFormat.JPEG, 100 , stream);
Image myImg = Image.getInstance(stream.toByteArray());
myImg.setAlignment(Image.MIDDLE);

//add image to document
doc.add(myImg);

//set footer
Phrase footerText = new Phrase("This is an example of a footer");
HeaderFooter pdfFooter = new HeaderFooter(footerText, false);
doc.setFooter(pdfFooter);

Toast.makeText(getApplicationContext(), "Created...", Toast.LENGTH_LONG).show();
} catch (DocumentException de) {
Log.e("PDFCreator", "DocumentException:" + de);
} catch (IOException e) {
Log.e("PDFCreator", "ioException:" + e);
finally
{
doc.close();
}
}      
void openPdf()
{
Intent intent = new Intent(Intent.ACTION_VIEW);
String path = Environment.getExternalStorageDirectory().getAbsolutePath() + "/PDF";

File file = new File(path, "demo.pdf");
intent.setDataAndType( Uri.fromFile( file ), "application/pdf" );
   startActivity(intent);
}
}


activity_main.xml

<RelativeLayout xmlns:android="http://schemas.android.com/apk/res/android"
    xmlns:tools="http://schemas.android.com/tools"
    android:layout_width="match_parent"
    android:layout_height="match_parent"
    tools:context=".MainActivity" >

    <Button
        android:id="@+id/button2"
        android:layout_width="fill_parent"
        android:layout_height="wrap_content"
        android:layout_below="@+id/textView1"
        android:layout_marginTop="100dp"
        android:text="Open PDF" />

    <Button
        android:id="@+id/button1"
        android:layout_width="fill_parent"
        android:layout_height="wrap_content"
        android:layout_alignParentLeft="true"
        android:layout_below="@+id/textView1"
        android:layout_marginTop="44dp"
        android:text="Generate PDF" />

    <TextView
        android:id="@+id/textView1"
        android:layout_width="wrap_content"
        android:layout_height="wrap_content"
        android:layout_alignParentTop="true"
        android:layout_centerHorizontal="true"
        android:layout_marginTop="50dp"
        android:text="@string/hello_world" />

</RelativeLayout>


Any Suggestion, Feel Free to Ask...
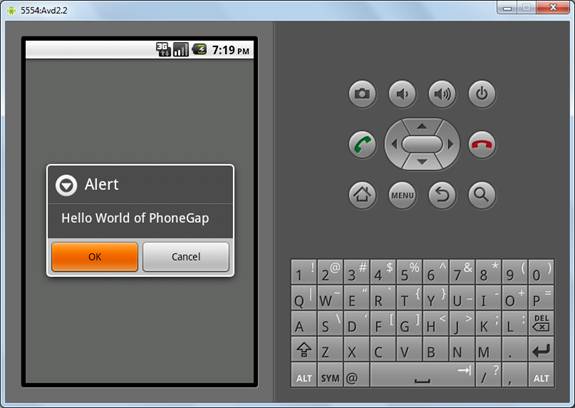
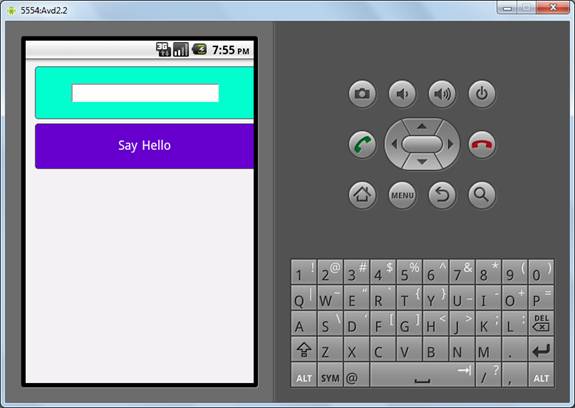
Download Demo

Click on AndroidPDFDemo.jar and Press CTRL+S 

Preview:

Preview


14 October, 2013

Android Most Useful Links For ICON'S

Android Asset Studio:


ICON GENERATORS — MAKE ICONS FOR YOUR APP:
Icon generators allow you to quickly and easily generate icons from existing source images, clipart, or text.
  1. Device frame generator (or see the official version for Nexus devices)
  2. Simple nine-patch generator

COMMUNITY TOOLS — SIMILAR TOOLS FROM THE OPEN SOURCE COMMUNITY
  1. Android Action Bar Style Generator by Jeff Gilfelt
  2. Android Holo Colors Generator by Jérôme Van Der Linden

24 September, 2013

How to make your users aware of incorrect input in Android

Did you ever enter a wrong password and got an AlertDialog telling you that you entered something wrong?
You probably did and you probably also noticed that this AlertDialog most likely takes one more click to continue, a click that could be saved. One way to avoid the AlertDialog are Toasts. Here are two nice but rarely used other ways to tell your users that they should enter something different.

Setup:


Let’s assume we have an EditText which we use in our UI.

EditText mEditText ;
mEditText = (EditText ) findViewById(R.id.myEditText );

Furthermore we have a method showError() which we call when the EditText contains invalid data.

  • Shake:

A nice way to show the user that, for example, an entered password was incorrect is to shake the EditText. Please note that I took this code from the official ApiDemos and modified it slightly.

First, we have to define our shake animation. Go to your res folder, create the subfolder anim and place a file shake.xml in it. In this file, create a translation like this:

<translate xmlns:android="http://schemas.android.com/apk/res/android" android:fromXDelta="0%" android:toXDelta="5%" android:duration="1000" android:interpolator="@anim/cycle_7" />
TranslateAnimation let us move views on the x or y axis of our screen. Since we want to shake it from left to right, we only apply the translation on the x axis. We move it from zero percent of the view’s width to five percent of the view’s width and let the translation last one second (1000 ms). Furthermore, we use the interpolator cylce_7 which is placed in anim/cycle_7.xml and looks like the following:

<cycleInterpolator xmlns:android="http://schemas.android.com/apk/res/android" android:cycles="7" />


It’s a simple CycleInterpolator. This kind of interpolators express the number of repetitions an animation should do. In our case, we repeat the animation seven times.
Now we only need to apply our shake animation to our EditText every time something incorrect is entered. We can do it like this:
private void showError() {
      Animation shake = AnimationUtils.loadAnimation(this, R.anim.shake);
      mEditText.startAnimation(shake);
}
That’s it. Super easy, super smooth integration into the UI.

  • setError()

This is my personal favourite. It is the setError()-method which comes out of the box with the EditText view. When calling this method, the right hand compound drawable of the will be set to the error icon. When the EditText also has focus, the text you gave to setError() will be shown in a popup. If you don’t like the default error icon, you can also use setError(CharSequence error, Drawable icon) to set your own icon. The routine to show errors can then look like this:
private void showError() {    mEditText.setError("Password and username didn't match");}
Which will result in errors shown like this:
setError() on ICS
Figure: EditText setError();

Which looks good, catches the user’s attention and doesn’t need any extra clicks to disappear.

Conclusion

Showing errors without interrupting the user flow can be accomplished easily on the Android platform  For even more attention by the user, the two methods mentioned can also be combined.
Please feel free to share your methods of showing error messages in the comments.

21 September, 2013

Robot Programming in Java

Robot class:

This class is used to generate native system input events for the purposes of test automation, self-running demos, and other applications where control of the mouse and keyboard is needed. The primary purpose of Robot is to facilitate automated testing of Java platform implementations.


Using the class to generate input events differs from posting events to the AWT event queue or AWT components in that the events are generated in the platform's native input queue. For example, Robot.mouseMove will actually move the mouse cursor instead of just generating mouse move events.

More about Robot class Click Here:

Example of Robot class:

I have created simple example for Robot class using KeyBoard Events:

Just Follow this Step:
  • Copy/Paste whole code in Notepad or any Editor.
  • Save with named "JavaRobotExample.java"
  • Run it
  • You may ask for Editor name to run in your computer for e.g. notepad, wordpad, winword etc. whatever you can write in Run window.
  • press Enter, now don't touch keyboard or mouse and just wait for while Running... Typing... Saving...
Have fun ;) 


import java.awt.AWTException;
import java.awt.Robot;
//import java.awt.event.InputEvent;
import java.awt.event.KeyEvent;
import java.util.Scanner;

public class JavaRobotExample
{
Robot robot = new Robot();
Scanner scanner;
public static void main(String[] args) throws AWTException
{
new JavaRobotExample();
}

public JavaRobotExample() throws AWTException
{

scanner = new Scanner(System.in);

String get;

System.out.print("\nEnter Program Name to Run In Your Computer... :- ");
get = scanner.next();

robot.setAutoDelay(50);
robot.setAutoWaitForIdle(true);

robot.delay(100);
robot.keyPress(KeyEvent.VK_WINDOWS);
robot.delay(500);
type("R");
robot.delay(500);
robot.keyRelease(KeyEvent.VK_WINDOWS);

robot.delay(500);
type(get);
robot.delay(1000);
type(KeyEvent.VK_ENTER);

robot.delay(5000);

type("Hello to everyone...!!");

type(KeyEvent.VK_ENTER);
robot.delay(50);
type(KeyEvent.VK_ENTER);

robot.delay(100);
type("This is a Robot Class Presentation in JAVA...!!!");
type(KeyEvent.VK_ENTER);

robot.delay(100);
type("Created By - Pratik Butani- MCA");
type(KeyEvent.VK_ENTER);
robot.delay(100);

type("- Android Developer at Kevalam Software");
type(KeyEvent.VK_ENTER);

robot.delay(100);
type("Contact No.- 88 66 22 45 46");
type(KeyEvent.VK_ENTER);
type("Thank You..!!!");

robot.delay(500);
robot.keyPress(KeyEvent.VK_CONTROL);

type("s");
robot.keyRelease(KeyEvent.VK_CONTROL);

robot.delay(1000);
type("pratik");
robot.delay(500);
type(KeyEvent.VK_ENTER);

robot.delay(1000);
type("y");        
robot.delay(1000);

robot.delay(1000);
type(KeyEvent.VK_ALT);
robot.delay(1000);
type("f");
robot.delay(1000);
type("x");

type("n");
System.exit(0);
}

private void type(int i)
{
robot.delay(50);
robot.keyPress(i);
robot.keyRelease(i);
}

private void type(String s)
{
byte[] bytes = s.getBytes();
for (byte b : bytes)
{
int code = b;
// keycode only handles [A-Z] (which is ASCII decimal [65-90])
if (code > 96 && code < 123) code = code - 32;
robot.delay(40);
robot.keyPress(code);
robot.keyRelease(code);
}
}
}

Have Fun :D

Thank you...

04 September, 2013

101 Most Useful Websites and WebApps

The Most Useful Websites and Web Apps

  1. screenr.com – record movies of your desktop and send them straight to YouTube.
  2. ctrlq.org/screenshots – for capturing screenshots of web pages on mobile and desktops.
  3. goo.gl – shorten long URLs and convert URLs into QR codes.
  4. unfurlr.come – find the original URL that’s hiding behind a short URL.
  5. qClock – find the local time of a city using a Google Map.
  6. copypastecharacter.com – copy special characters that aren’t on your keyboard.
  7. postpost.com – a better search engine for twitter.
  8. lovelycharts.com – create flowcharts, network diagrams, sitemaps, etc.
  9. iconfinder.com – the best place to find icons of all sizes.
  10. office.com – download templates, clipart and images for your Office documents.
  11. followupthen.com – the easiest way to setup email reminders.
  12. jotti.org – scan any suspicious file or email attachment for viruses.
  13. wolframalpha.com – gets answers directly without searching   – see more wolfram tips.
  14. printwhatyoulike.com – print web pages without the clutter.
  15. joliprint.com – reformats news articles and blog content as a newspaper.
  16. ctrql.org/rss – a search engine for RSS feeds.
  17. e.ggtimer.com – a simple online timer for your daily needs.
  18. coralcdn.org – if a site is down due to heavy traffic, try accessing it through coral CDN.
  19. random.org – pick random numbers, flip coins, and more.
  20. pdfescape.com – lets you can quickly edit PDFs in the browser itself.
  21. viewer.zoho.com – Preview PDFs and Presentations directly in the browser.
  22. tubemogul.com – simultaneously upload videos to YouTube and other video sites.
  23. ctrlq.org/dictation – online voice recognition in the browser itself.
  24. scr.im – share you email address online without worrying about spam.
  25. spypig.com – now get read receipts for your email.
  26. sizeasy.com – visualize and compare the size of any product.
  27. myfonts.com/WhatTheFont – quickly determine the font name from an image.
  28. google.com/webfonts – a good collection of open source fonts.
  29. regex.info – find data hidden in your photographs – see more EXIF tools.
  30. livestream.com – broadcast events live over the web, including your desktop screen.

06 August, 2013

Online Timer on Google Search

Google as an Online Timer

Do you need a simple timer to remind you of upcoming tasks like wishing someone special at perfect moment, making that phone call to your clients or other person or may you have to do some important task. There are good web apps, e.ggtimer.com for example, that let you create countdown timers in the browser quickly but you probably don’t need them anymore.

That’s because you can now setup online timers inside Google itself by entering the timer command in the search box in the following format (the word “set” is optional):
timer for <time> OR set timer for <time>
The <time> can use a combination of hours, minutes and seconds. For instance, you may use search commands like set timer for 20 seconds or timer for 1 hour 2 minutes and the timer will spring into action. When the time has passed, the browser plays a sound.

One more thing. Instead of setting the time in the search command, you can just use the search query “timer” inside Google and then manually set the timer.
This tip is courtesy Amit Agarwal. And while we on the topic of online timers, you should also check out timer-tab.com – this one lets you set any YouTube video as the notification alarm. 

Facebook Launches Tool for Creating Embedded Posts

I had previously shared a post for embedding Facebook posts in your website but looks like you no longer need it as Facebook has officially launched the code generator for embedded posts at developers.facebook.com.

Just paste the URL of a Facebook post, hit the “Get Code” button and pick the HTML5 version of the embed code. Also, the warning on the Facebook page still says that “embedded Posts are currently available to a handful of news publishers” but it can be ignored as the generated embed code works just fine for any public post shared on Facebook.

02 August, 2013

How to Embed Any Facebook Post

Facebook has added a new “embedded posts” feature to help you embed any Facebook content – you can embed photographs, videos or even regular status updates – on another website or blog. For instance, if a celebrity has shared a photograph on his or her Facebook Page, you can easily embed that image on your website by adding a single line of code.


You may embed any content that’s shared on Facebook Pages and personal profiles as long as the content owner has set the visibility of that post to Public.
There’s a small catch though. Facebook has enabled the Embedded Posts functionality for a handful of big web publishers including CNN, Mashable and The Huffington Post. Everyone else will have to wait to see that Embed link alongside their Facebook content.
Here’s the trick. Open any Facebook Post and copy the permalink (permanent URL) of that post. You can right-click the date of the post to determine its permalink. Next replace YOUR_URL_HERE in the snippet below with the permalink that you just copied and paste the modified snippet anywhere in your website. Done!

<div id="fb-root"></div><script>(function(d, s, id) {    var js, fjs = d.getElementsByTagName(s)[0];    if (d.getElementById(id))        return;    js = d.createElement(s);    js.id = id;    js.src = "//connect.facebook.net/en_US/all.js#xfbml=1";    fjs.parentNode.insertBefore(js, fjs);}(document, 'script', 'facebook-jssdk'));</script><fb:post href="YOUR_URL_HERE"></fb:post>


If you wish to embed another Facebook post on the same web page, you don't have to copy-paste the entire snippet. Just add a new <fb:post> element and set the value of href as the permalink of your Facebook Post.

19 July, 2013

12 July, 2013

Creating an Android “Hello World” Application with PhoneGap

Creating Android “Hello World” Application using PhoneGap


What is PhoneGap?

PhoneGap is an open source platform that allows you to create cross-platform mobile applications with HTML, JavaScript, and CSS. In order to interact with device hardware, PhoneGap provides a JavaScript API that will interface with features such as the on-board camera, GPS, and accelerometer. Even though PhoneGap is great for developing cross-platform applications, the code for developing applications while targeting one platform or another will vary. One of the greatest differences to overcome is the required software requirements. This tutorial will provide an in-depth review of setting up your development environment for Android, and will build a simple “Hello World” app.


PhoneGap Requirements for Android Development:

Java JDK

You will need to install the Java Development Kit (JDK). Follow the official instructions for setting this up.

Android SDK

You will also need the Android Software Development Kit. When you install the SDK, you will need to set the the android-sdk-<os>/tools for your user PATH variable.
System Properties

Eclipse

You will need to download and install Eclipse if you don’t already have it on your machine.

Eclipse ADT Plugin

You will need to also install the ADT plugin for Eclipse. ADT (Android Development tools) is a plugin of eclipse which provide a complete IDE for developing Android application. ADT lets you create new Android projects, and it lets you create Android projects from existing source (this is the way we will open our PhoneGap app for android on eclipse). Using ADT you can also debug an android application. As ADT is well integrated with android SDK running the app from the IDE directly launches the android emulator.
To install ADT click on “install new software” in your Eclipse’s help window and enter the following site to work with: http://dl-ssl.google.com/android/eclipse/. Then follow the wizard presented to install ADT.
ADT Screen

Android Platforms and Components

Once you have ADT installed, you will need to install the Android platform and other components. To do that, go to menu option window->Android DK and AVD manager and select the platform and API level. Android api 2.2 is latest at the time of writing this article.
ADT Configuration

Apache Ant

If you don’t have apache ant installed you can download it from http://ant.apache.org/bindownload.cgi. To install it you will just extract the downloaded Zip file and set the bin folder in the ant directory in you PATH variable.

Ruby

If you don’t have Ruby installed, you can download it from this free installer. Once installed, add the Ruby/bin path into your account’s PATH variables.

PhoneGap Framework

Of course, you will also need the PhoneGap Framework itself.
PhoneGap-Android Download

Creating Your Development Workspace

Environment Variables Check:

The following paths should be set in you account’s PATH variable:
  • your_system_path/jdk/bin
  • your_system_path/android-sdk/tools
  • your_system_path/ruby/bin
  • your_system_path/apache-ant/bin
Apart from these, you will need to set the following variables also:
  • JAVA_HOME – path of your JDK directory
  • ANT_HOME – path of you apache-ant directory
  • ANDROID_HOME – path to your android SDK directory.
To create a workspace for your PhoneGap app on android, go to the “phonegap-android” folder on the command prompt or terminal:
  1. ruby ./droidgap "[android_sdk_path]" [name] [package_name] "[www]" "[path]"  
  • android_sdk_path: Where you installed the SDK
  • name: The name to give the new application.
  • package_name: The name you want to give to your application.
  • www: The folder from where you want to copy the files of your PhoneGap app.
  • path: The application workspace for your project.
Once you run the command and if everything goes correct messages as shown below will be seen:
PhoneGap Command Line Android
The above should create a complete workspace for your PhoneGap Android app.
Workflow

Setup Your Project in Eclipse

Once this is done, this workspace can be opened in eclipse. In eclipse choose new project and then choose Android Project.
Create Android Eclipse Project
Next select “create project from existing source” and give the project a name as shown below.
Configure an Android Eclipse Project
If you try to build and run the project in Eclipse you will get a build error. This is because you have not added the external library (phonegap.jar) which is created in the libs folder of your workspace.
Remove Build Errors
To add that external library right click on the project an select Build Path-> Add external archive and then select the phonegap.jar in your libs folder.
Remove Build Errors 2
If all goes well, this should remove all the build errors in your project. Now try to run your project in the emulator. You should see the screen below. This is because you have not added any PhoneGap HTML or JavaScript files in your project.
Running the Hello World App
In the assets/www folder of the workspace, there will already be a file called phonegap.js. In that folder create a file called index.html with the following code:
  1. <!DOCTYPE HTML>  
  2. <html>  
  3.   <head>  
  4.     <meta name="viewport" content="width=320; user-scalable=no" />  
  5.     <meta http-equiv="Content-type" content="text/html; charset=utf-8">  
  6.     <title>PhoneGap Android App</title>  
  7.               <script type="text/javascript" charset="utf-8" src="phonegap.js"></script>  
  8.               <script type="text/javascript" charset="utf-8">  
  9.                         var showMessageBox = function() {  
  10.                              navigator.notification.alert("Hello World of PhoneGap");  
  11.                         }  
  12.                         function init(){  
  13.                              document.addEventListener("deviceready", showMessageBox, true);  
  14.                         }  
  15.   </script>  
  16.   </head>  
  17.   <body onload="init();"  >  
  18.   </body>  
  19. </html>  
In the code the line:
  1. <script type="text/javascript" charset="utf-8" src="phonegap.js"></script>  
includes the phonegap.js file which lets you call native API’s of android. On the load of the body the init function registers the function showMessageBox on the PhoneGap event deviceready which is triggered when phonegap has done the processing to initialized everything for your program so that it can call the PhoneGap API’s. The showMessageBox function calls the PhoneGap API navigator.notification.alert which displays the message box on screen. Running the app after adding the index.html and refreshing the project in Eclipse you will see the following screen:
Making it an Alert
Now let’s add some more functionality to our app. The following code creates a text box to enter the name of the person and a button when clicked displays a message box:
  1. <!DOCTYPE HTML>  
  2. <html>  
  3.   <head>  
  4.     <meta name="viewport" content="width=320; user-scalable=no" />  
  5.     <meta http-equiv="Content-type" content="text/html; charset=utf-8">  
  6.     <title>PhoneGap</title>  
  7.               <script type="text/javascript" charset="utf-8" src="phonegap.js"></script>  
  8.               <script type="text/javascript" charset="utf-8">  
  9.               var displayHello = function() {  
  10.                         var name =      document.getElementById("firstname").value;  
  11.                         navigator.notification.alert("name" + name);  
  12.             }  
  13.    </script>  
  14.   </head>  
  15.   <body onload="init();" id="bdy" >  
  16.             <div id="txt">  
  17.             <input   type="text" name="firstname" id="firstname" />  
  18.             </div>  
  19.             <div id ="btn">  
  20.     <a href="#" class="btn" onclick="displayHello();">Say Hello</a>  
  21.             </div>  
  22.         </div>  
  23.   </body>  
  24. </html>  
In the following line of code we have created a text box where you can enter your name.
  1. <input   type="text" name="firstname" id="firstname" />  
In the line
  1. <a href="#" class="btn" onclick="displayHello();">Say Hello  
We have created a link which on click calls the function displayHello which fetches the value from the text box and displays a message box saying hello to the name entered by the user.
Custom Alert Text
Final Preview
The GUI shown above does not have any styling to it. You can beautify the display and add colors to it using a CSS file. Create a master.css in your assets\www folder with the following code:
  1. #bdy  
  2. {  
  3.             background:#F0F0F0;  
  4. }  
  5. #btn a{  
  6.             border: 1px solid #555;  
  7.             -webkit-border-radius: 5px;  
  8.             border-radius: 5px;  
  9.             text-align:center;  
  10.             display:block;  
  11.             float:left;  
  12.             background:#6600CC;  
  13.             width:308px;  
  14.             color:#FFF;  
  15.             font-size:1.1em;  
  16.             text-decoration:none;  
  17.             padding:1.2em 0;  
  18.             margin:3px 0px 3px 5px;  
  19. }  
  20. #txt{  
  21.             border: 1px solid #555;  
  22.             -webkit-border-radius: 5px;  
  23.             border-radius: 5px;  
  24.             text-align:center;  
  25.             display:block;  
  26.             float:left;  
  27.             background:#00FFCC;  
  28.             width:308px;  
  29.             color:#9ab;  
  30.             font-size:1.1em;  
  31.             text-decoration:none;  
  32.             padding:1.2em 0;  
  33.             margin:3px 0px 3px 5px;  
  34. }  
In your index.html add the following line before in your head tags to link to master.css:
  1. <link rel="stylesheet" href="master.css" type="text/css" media="screen" title="no title" charset="utf-8">  
Now if you run the app you should see a screen like the following:
Final Preview

Conclusion

To create a PhoneGap app on Android, a lot of different software has to work together. This could mean that you could have trouble setting up the complete environment to create a PhoneGap app on Android. However, once all the software is in place, you can easily create PhoneGap apps using open web standards like HTML, JavaScript, CSS and PhoneGap’s own API’s to perform device hardware specific processing. This saves you the trouble of learning the native language for Android programming and still has much of the power of custom, native built Android apps.